『ドラゴン・ブリッジ(Dragon Bridge)(BGA)』の遊び方・魅力をご紹介!
| ボードゲームの基本情報 | |||
|---|---|---|---|
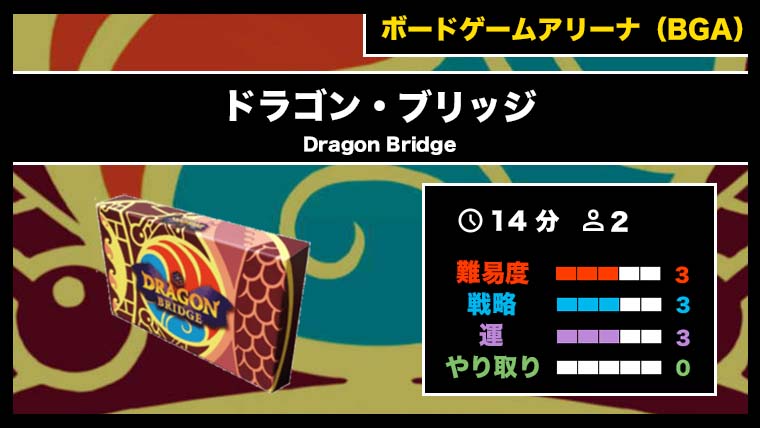
| タイトル | ドラゴン・ブリッジ(Dragon Bridge) | ||
| 特徴 | ドラゴンブリッジでは、プレイヤーはお互いの魔術師を操作し、18x1マスを前後に移動し、呪文を唱え、魔法のアイテムを獲得し、ドラゴンをどちらかの側に誘います。 プレイヤーは対戦相手をドラゴンにぶつけるか、ドラゴンから逃げ切る事で勝利します。 | ||
| プレイ人数 | 2 人 | プレイ時間 | 14 分 |
| ゲームデザイナー | Keith Burgun | 複雑さ | 3 |
| アートワーク | Keith Burgun | 戦略 | 3 |
| エディター | Keith Burgun Games | 運 | 3 |
| 発売日 | 2019 | やり取り | 0 |
※画像・基本情報はボードゲームアリーナ公式HPより
ドラゴン・ブリッジ(Dragon Bridge)とは?
「ドラゴンブリッジ」は「ジェムウィザーズ」の世界観を舞台にした、2人用のスピーディーな競争型カードゲームです。
あなたと相手はそれぞれウィザードを操作し、ドラゴンに取り囲まれた橋に立ち往生しています。ゲームの目的は、逃げるか相手をドラゴンに突き落とすことです。
ドラゴン・ブリッジ(Dragon Bridge)の遊び方
ゲームの準備
内容物
・魔法使いカード(15枚)
・橋カード(3枚)
・アクションカード(17枚)
・緑のジェムカード(6枚)
・アイテムカード(9枚)
・白のジェムカード(8枚)
・ブリッジハックカード(9枚)
・ドラゴンカード(1枚)
準備
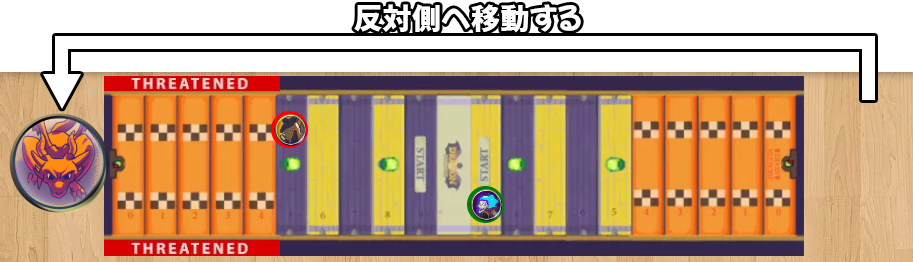
❶3枚の橋カードを縦向きで配置して橋を作ります。
❷ドラゴンカードを橋の一番上(Dragonと書かれた側)に置きます。
❸アクションカードをシャッフルして山札を作成する。
❹アイテムカードを9枚シャッフルし、表向きにして山札の横に置き、その中から3枚を表向きにして置きます。
❺各プレイヤーの前に緑のジェムカードを3枚置きます。
2つは裏向き(使用状態)、1つは表向き(使用可能な状態)です。
❻スタートプレイヤーをランダムに決め、各プレイヤーは山札からアクションカードを4枚引く。
❼各プレイヤーは魔法使いを選び、魔法使いカードを中央のスタートタイルの隣に配置します。スタートプレイヤーがドラゴンに近い方のスタート位置に魔法使いを置きます。
❽ブリッジハックカードをシャッフルして、3枚を表向きにして近くに配置します。また、白いジェムカード供給を取り出し、全プレイヤーが取れる位置に配置します。
最初の画面は以下のようになります
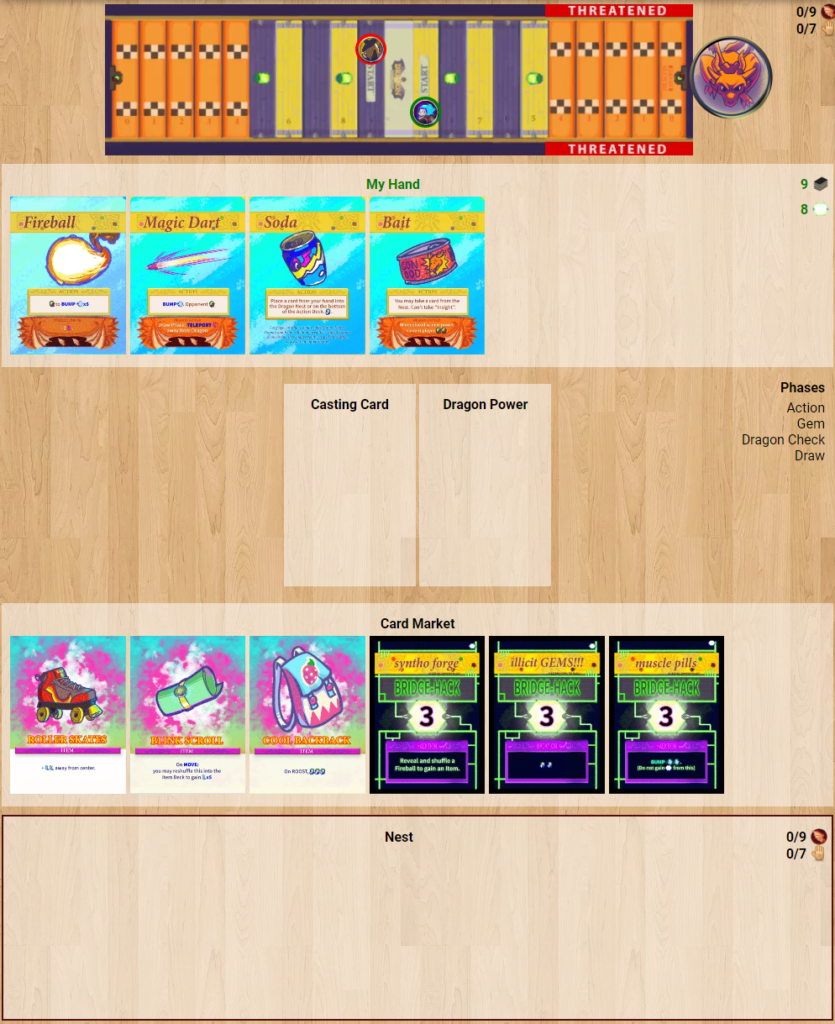
ゲームの流れ
各プレイヤーは順番に以下の流れでアクションを行ないます。
1. アクションフェーズ:アクションカードを使用する。
2. ジェムフェーズ:アイテムを購入やジェムを起動を行う。
3. ドラゴンチェック:フライトまたはローストをチェックする。
4. ドロー:手札が4枚になるまでカードを引く。
1. アクションフェーズ
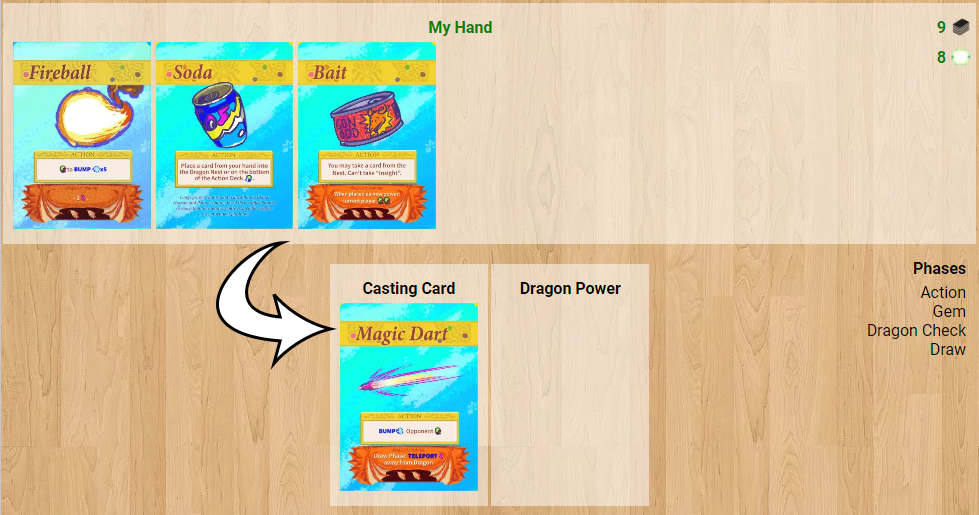
手札のカードを表向きにあなたの前に置き、カードの効果を実施します。
効果を実施した後、アクションカードをドラゴンネストに配置します。
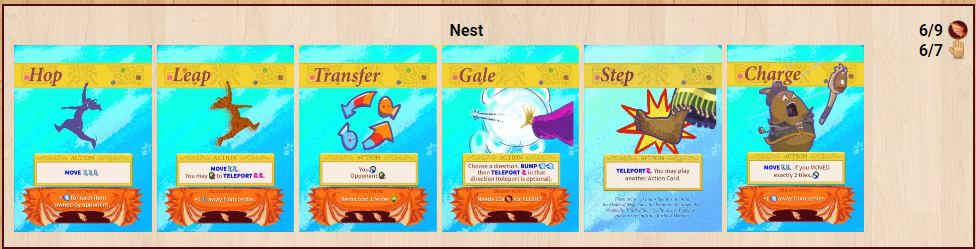
移動(MOVE)
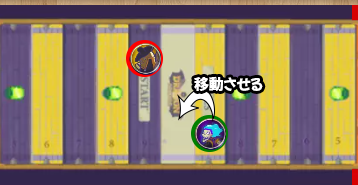
「MOVE」とある場合、それは指定された数のマスまで(希望する場合はゼロマス)任意の方向にキャラクターを移動することを意味します。
アイテムカードや魔法使いの効果で移動数を追加することも選択できます。
バンピング(BUMP)
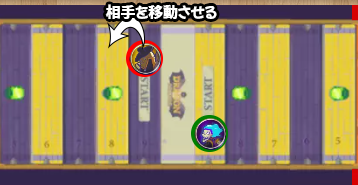
相手の魔法使いを指定された数、任意の方向に移動します。
また、BUMPを実行するたびにサプライから白いジェムを1つ獲得します。サプライに白いジェムがない場合は、代わりに相手から1つ取ります。
アイテムカードや魔法使いの効果で追加することも選択できますが、そうする場合は可能な限り最大限の移動をします。
なお、一部のアイテムや魔法使いは特定の方向(「中央から離れる」といった具合)にバンピングする場合にのみボーナスを追加できるようになっています。
テレポート(TELEPORT)
テレポートはMOVE同様、魔法使いを移動させることができます。
ただしテレポートでは、勝利条件を満たすことは出来ません。
アクションカードの効果はすべて可能な限り強制されます。
| カード | 効果 |
|---|---|
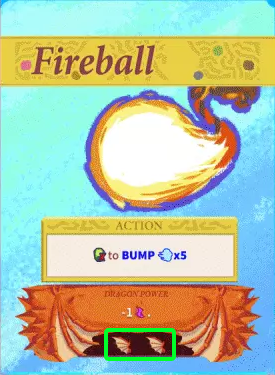
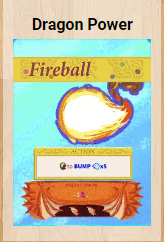
| Fireball 緑のジェムを1つ使用することで、BUMP(5)を行う。 ドラゴンパワー MOVEは(-1)される。 | |
| Dazzle MOVE(2)を行う。 ドラゴンネストにあるカードを任意で選び、アクション山札の一番下に置いてもよい。 | |
| Flame Arrow 中央から離れるようにBUMP(4)を行う。 またはBUMP(2)を行う。 ドラゴンパワー ドラゴンフライトに必要なドラゴンの羽が10個になる。 | |
| Magic Dart BUMP(1)を行い、相手の緑のジェムを1つ使用済みにする。 ドラゴンパワー ドローフェイズでドラゴンから離れる方向へTELEPORT(1)が行われる。 | |
| Soda 手札のカードをドラゴンネストに置くか、アクションデッキの一番下に置く。 緑のジェムを1つ使用可能状態にする。 | |
| Transfer 自分の緑のジェムを1つ使用可能状態にし、 相手の緑のジェムを1つ使用済み状態にする。 ドラゴンパワー アイテム購入に必要なコストが-1される | |
| Charge MOVE(2)する。 もしタイルを移動ちょうど2つ移動したら、自分の緑のジェムを1つ使用可能状態にする。 ドラゴンパワー 中心から離れる場合、BUMPは(+1)する。 | |
| Step TELEPORT(1)を行います。 もう1枚のアクションカードを使用できます。 | |
| Gale 方向を選択し、その方向にBUMP(2)してからTELEPORT(1)します。 (※TELEPORTは任意) ドラゴンパワー ドラゴンフライトに必要なドラゴンの羽が10個になる。 | |
| Bait ネストから1枚のカードを取ることができます。ただし、「Insight」は取れません。 ドラゴンパワー このカードがドラゴンパワーになった時、全プレイヤーの緑のジェムは2個使用済みの状態になる。 | |
| Insight 相手の手札を公開します。彼らから1枚カードを取るか、ネストから取ります。自分の使用可能な緑のジェムが1枚だけの場合、緑のジェムを1つ使用可能状態にします。 ドラゴンパワー もしジェムタイル上にいない場合、相手は緑のジェムを1つ使用済みにし、自分は緑ジェムを1つ使用可能状態にします。 | |
| Hop MOVE(3)を行う。 ドラゴンパワー 相手が持っているアイテム1つにつき、BUMP(+1)になります。 | |
| Leap MOVE(2)を行う。 緑のジェムを使用することでTELEPORT(2)を行う。 ドラゴンパワー 中心から離れる場合、MOVEは(+1)する。 | |
| Shockwave BUMP(2)を行う。 相手はランダムにMOVEアクションカードを1枚捨てるか、手札を公開します(手札がない場合)。 ドラゴンパワー 全ての黄色タイルはジェムタイルになる。 | |
| Checkmate MOVE(2)を行う。 緑のジェムを使用することでBUMP(3)を行う。 ドラゴンパワー ドラゴンフライトに必要なドラゴンの羽が11個になる。 |
2. ジェムフェーズ
ジェムフェーズでは、以下のいずれかのジェムアクションが実施できます。
使用可能な緑ジェムを1つ使用して、テレポート(2)を実施します。
裏向き(使用済)の緑ジェムカードを1つ裏返して使用可能状態にします。
これはジェムタイルに立っているときのみ可能です。
使用可能状態の緑のジェムを3つ消耗してアイテムを獲得できます。
アイテムデッキの横にある表向きのアイテムのうち1つを取り、あなたの前に配置します。そのアイテムの能力は使用出来る状態になります。
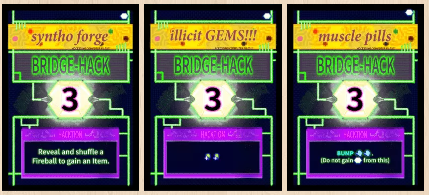
ブリッジハックカードに書かれている数字分、白いジェムを支払ってブリッジハックカードの効果を実施します。
一部のキャラクターには、ジェムアクションとしてプレイできる能力があります。
これはジェムフェーズにおいて、ジェムアクションとして行うことができる別のアクションとしての意味です。
まだ1つしかジェムアクションをプレイしていない場合でも、これによりジェムアクションを行う他の選択肢が1つ増えます。
3. ドラゴンチェック
ドラゴンネスト(使用したカードが配置されるスペース)にあるアクションカードを確認して条件を満たした場合、ドラゴンフライトまたはローストを実施します。
ドラゴンフライトまたはローストを実施した後、場のアイテムカードを3枚になるまで補充します。
一部のアクションカードには、ドラゴンの羽(1~3)が書かれています。
ドラゴンネストにあるカードでドラゴンの羽が9個以上ある場合、ドラゴンフライトを実行します。
ドラゴンフライトは、以下の手順で実施されます。
1. 最後に使用したアクションカードをドラゴンの下に配置する
最後に使用したカードをドラゴンカードの下に置きます。
(BGAでは、ドラゴンパワー枠に配置)
既にある場合は新しいカードと置き換え、前のカードは山札に戻してシャッフルします。
これによりドラゴンに新しいパワーが追加されます。
(オレンジ枠の効果がドラゴンに追加されます)
2. ドラゴンネストをリセットする
ドラゴンネストに残っている全てのカードを山札に戻してシャッフルします。
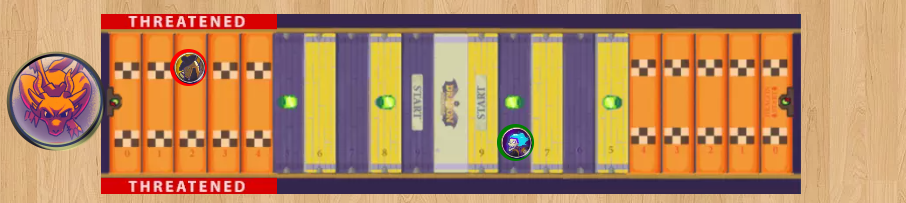
3. ドラゴンを反対側に移動する
ドラゴンとその新しいパワーカードを地図の反対側に移動します。
カードを数えます。ドラゴンフライトを実行しない場合、ネストに7枚以上のカードがある場合、それらをすべて全てに戻します。
次に、アクションの山札から1枚のカードを表向きでドラゴンネストに配置します。
このアクションはローストと呼ばれ、ネストをリセットするだけです。
(一部のキャラクターやアイテムのパワーはローストで発動します)
4. ドロー

手札が4枚になるまでカードを補充します。
ゲームの終了条件
橋の両端にある5つのオレンジのタイル(終了タイル)に魔法使いがいる時に勝利/敗北条件を満たした場合、ゲーム終了となります。
ドラゴンがいない場合、オレンジのタイルは出口タイルとなります。
出口タイルに立っている間にMOVEを行うと、逃走してゲームに勝利します。
ドラゴンがいる場合、脅迫されたタイルと見なされます。
このタイルにいる状態で自分のジェムフェーズが終了した場合、脅迫されたタイルに立っている場合、急襲されてゲームに敗北します。
両方の勝利条件はドラゴンチェックよりも前にトリガーされます。つまり、このターンにフライトが起こる場合、勝敗を確認するためにドラゴンチェックフェーズには到達しません。
つまり、プレイヤーが勝利または敗北したターンにドラゴンの側が切り替わることはありません。
アイテムカード一覧
| カード | 効果 |
|---|---|
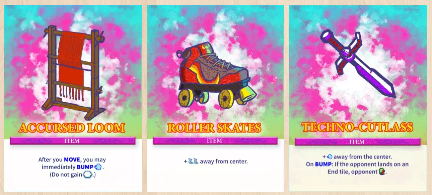
| ACCURSED LOOM MOVEした後、すぐにBUMP(1)することができます。 (白いジェムは獲得しません) | |
| THUNDERBOX ドラゴンチェック時、これを山札に戻すことでドラゴンの羽を+2または-2できる。 | |
| RUUPART’S BLADE 中央から離れるBUMPを行う際、BUMP(+1)。 さらにこのカードを山札に戻した場合、BUMP(+4)されます。 | |
| ROLLER SKATES 中央から離れるMOVEを行う際、MOVE(+2)。 | |
| TECHNO-CUTLASS 中央から離れるBUMPを行う際、BUMP(+1)。 BUMPした際、相手が終了タイルに着地した場合、相手は緑ジェムを1つ使用済みにします。 | |
| TRANSMOGRIFIER ジェムアクション:これを山札に戻すことで、白いジェムを5個獲得し、ブリッジハックを購入します。その後、アイテムカードを1枚引きます。 | |
| BLINK SCROLL MOVE時、このカードを山札に戻すことでMOVE(+5)される。 | |
| COOL BACKBACK ロースト時、緑のジェムを3個使用可能状態にする。 | |
| VR HELMET ATTACHMENT CABLE ACCOUTREMENT このカードを獲得した際、白いジェム2個を獲得し、TELEPORT(3)を行う。 ロースト時、白いジェム2個を獲得する |
キャラクター一覧
| キャラクター | 効果 |
|---|---|
| デルビーポケット ・ローストした時、テレポート(2)を行う ・ジェムフェーズ後、ドラゴンネストにドラゴンの羽が3つまたは5つある場合、緑のジェムを獲得 | |
| イブ・ウィリアムズ ・紫色のタイルからBUMPした場合:BUMP(+2)され、相手が緑ジェムをより多く持っている場合、緑ジェムを獲得する ・アイテムを1つ持っている場合:テレポート(+1) | |
| バニー・ウィザード ・ジェムアクション:緑のジェムを1つ使用して、アクションカードを使用する。その後、シャッフルする。 ・2つ目のアイテムを取得した場合:緑のジェムを2個獲得する(ゲーム中に1回)。 | |
| アブラゲイル ・1~2つの準備完了した緑ジェムでターンを始めた場合、ターン全体にMOVE(+1)、BUMP(+1)が適用されます。 ・アイテムを購入した後:ドラゴンネストから任意のカードを取ることができます。 | |
| ヴェニス・ゴーン ・ターン開始時:中心に向かってテレポートできます。 (能力の効果が発揮されます) ・スタートまたは中心のタイルからBUMPした場合:もしドラゴンのパワーカードがあれば、緑ジェムを使用することでドラゴンネストに配置できます。もしドラゴンのパワーカードがない場合、緑ジェムを1つ使用可能状態に変更できます。 | |
| オマー・エヴァンス ・ゲーム開始時:緑のジェムカードを2つしか持っていません。 ・ジェムアクション:もしアイテムが0個しか持っていない場合、緑のジェムまたは白いジェム2つを使用して、アイテムを取得します。 ・ジェムアクション:アイテムを1つシャッフルし、BUMP(6)を実施します。 | |
| アンドロメダ・ロビン ・ジェムアクション:緑のジェムを使用してBUMP(2)する ・BUMPアクションを行なった後:緑ジェムを横に置いておきます。 (この緑のジェムは使用することができなくなります) ・ターン開始時:横に置いていた緑のジェムを使用可能状態で戻す ・相手のBUMPアクション時:横に置いていた緑のジェムを1枚戻して、使用状態にする | |
| ピーブナップ・ババー ・常に:ドラゴンネストにある「Charge」1枚につき、MOVE(+1)。 ・ジェムアクション:両プレイヤーは緑のジェムを1つ使用状態にする。その後、再度自分の緑のジェムを1つ使用可能状態にする。 | |
| ディセンバー・ヤマネ ・ターン開始時:ドラゴンネストにドラゴンの羽が5つ以下ある場合、BUMP(2)を獲得する。それ以外の場合、BUMP(-2)を獲得する。 ・アクションフェーズ:もし相手を最後のブリッジタイルを超えてBUMPした場合、緑のジェムを2つ使用可能状態にする | |
| トレバー・レベッベデ ・ロースト時:緑のジェムを1つ使用状態にする ・フライト時:緑のジェムを1つ使用可能状態にする ・アクションフェーズ:緑のジェムを2つ使用することで、最大3回までアクションを行う。行った3枚のアクションのカードは全てシャッフルされる。 | |
| ゲルフ・ランズ ・相手にタイル以内に近づいてBUMPした場合:相手の位置にMOVEします。 ・フライト時:ドラゴンに緑のジェムを1つ配置します。ドラゴンの位置にいる間、フライトには+1のドラゴンの羽がかかり、相手はテレポートを使用できません。次のローストまたはフライト時に、緑のジェムは使用可能の状態で元の位置に戻ります。 |